

Xf1re - Linux Companion software
Back in the day I just loved Xfire, and it was so sad when I read that it was closed down. Thankfully it was revived by effort of a few that decided to revive this wonderful platform. I wont go into the details here since download and instructions are already long enough, but you can check the official page here:
www.xf1re.com
The current Version of the software is 0.7 and at the moment it is missing some features, there might be bugs and it is lacking a proper GUI that I plan to have ready for 1.0
What it is this software?
One of the problems of Xf1re is that is doesnt work naively on Linux (shocking, I know), so many of its cool features like taking pictures or just tracking the time of your games. The software itself can run on Linux through wine/proton, if you need information about how to do it, I put a guide in... well the 'Guides' section of this web. After all the effort of the admins of Xf1re I decide to do something as well and decided to try to solve as much as I can the incompatibilities of Linux and Xf1re. Instructions are below, but I will elaborate a little more on how it works
The concept is really simple. Since Xf1re cant read or process and detect when our games (unless you run them in the same wine prefix, but I personally havent try it or recommend it) what I did was to deploy some 'dummie windows' (more on that later) that are nothing more than actual empty windows with enough information so that Xf1re can detect them and start tracking our gaming time. These will run inside the same prefix and I can confirm it works
Now for the other element I wanted to solve was to take pictures and then upload them to the platform. The part of taking a screenshot is quite easy, just take a full screenshot of your screen (window would probably just be a headache and wont work more of the times). That by itself is not enough since the platform is waiting the Xf1re format, so what I did was to actually read what kind of information is injected on the pictures and then replicate the process. This works and every picture can be correctly uploaded to the platform.
Finally doing this manually can work, but it is a pain in the ass. We are Linux users, not masochists (depends on your distro). So this is where the companion software comes in: it works alongside Xf1re and it will trigger it corresponding dummie window for the tracking. While ingame, you can press the photo key (by default 'Home') and it will take a screen capture of your screen, save it on the "Images" folder of Xf1re, and then inject the game data into the file, so it can be uploaded.
Software guide
Creating dummie windows .exe
The current version of the software is 0.7, and it is currently lacking a proper GUI, so just be ready to open a couple of note pad and just the terminal. Speaking of terminals a core element of this software is the deploy of dummie windows. These are nothing more than just triggers for the Xf1re to detect. So it is a good place to start talking about them. On this page you will also find a package of these dummie windows. The current ones included are:
- ArmA 3
- Battlefield 1942
- Battlefield 2
- Battlefield 2142
- Battlefield 4
- Enemy Territory: Quake Wars
- EvE: Online
- Dawn of War
- DCS
- Final Fantasy XI: Online
- Freelancer
- PlanetSide 2
- Pro Pilot 99
- The Sims 2
- Squad
- StarCitizen
- Star Wars: Galaxies
- Star Wars: Galactic Battlegrounds
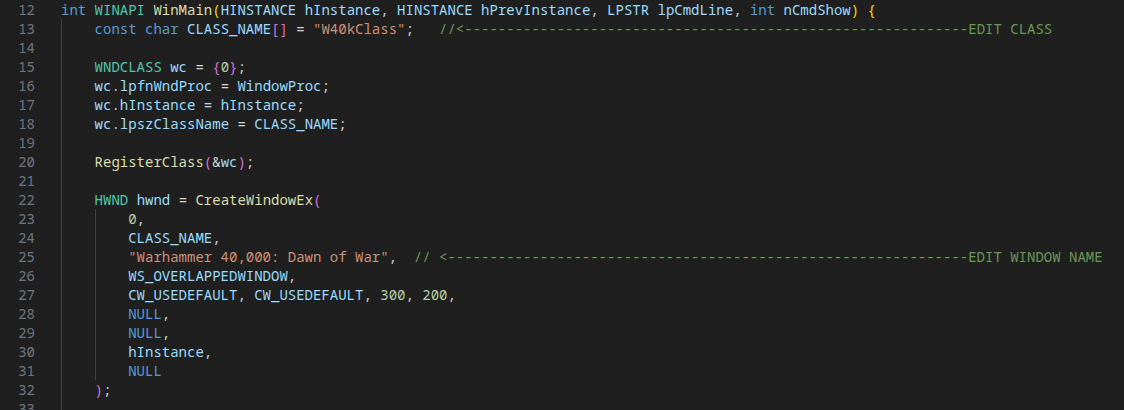
As you can see it is only on line 13 and line 25. What information to put there? Depends, in order to know what to do you just need to open the 'xfire_games.ini' file that is located on /Your prefix/drive_c/ProgramData/Xfire. You will use it a lot, so try to remember where it is. Use control + F (depends on what you are using to see the file) and search for the name of the game. You should find something like this:
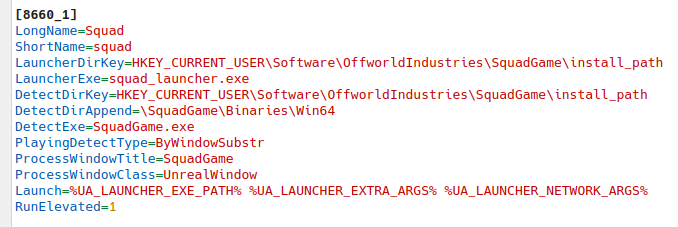
As you can see on the previous image, all information you need are right there. It can and will be different from yours but the important stuff you need to pay attention to are the following lines to build your dummie window:
- "ProcessWindowName": This is the name of window. The entry might not have one, but if it does, note it down since Xfire will search for this name
- "DetectExe": This one is the name that you will use when you build the actual dummie window with 'mingw-w64-gcc'. Dont worry I will tell you later
- "ProcessWindowClass": Not all entries has this, but if your game has it, then note it
1- Go to line 13 and search for "const char CLASS_NAME[] = " ". Here there are 2 alternatives:
a - If your games does have a "ProcessWindowClass", you will use that one on this. Following the example of 'Squad', the line would be "const char CLASS_NAME[] = "UnrealWindow"
b - If it doesnt have one, then just add the exe name on it. The script already comes with a example line: "40kClass". Keep the 'Class' part
2 - Now go for line 25. Here is goes what will be displayed on the window name. If you game en try has a "ProcessWindowName" put it here. For the Squad Example, this line would be: "SquadGame", but if you dont have one, then just use the name of the game.
NOTE: if you are having issues with detection, one possible fix is to simply just open the game on wine, and note the name of the window.
3- Now it is time to build! The process is really simple: just go yo the folder where the 'main.cpp' is located on your terminal with 'cd', or just right click (on KDE btw) and select 'Open terminal here'. If you are feeling fancy and it is compatible with your environment you can also press "Alt + Shift + F4" to also open the terminal on that folder location. Now with the terminal open just type the following:
x86_64-w64-mingw32-gcc main.cpp -o [Detect exe name].exe
With this you should have a working empty window. You can test it on Wine/proton/any windows programs launchers, but unless it is running on the same prefix and same runner as your Xf1re, it wont be picked up. If you are running Xf1re on Bottles, you can add these .exe on your bottles with the "+ Add Shortcuts...", then launch them before you start a game. But if you want a more automatic stuff, then lets move the more interesting stuff, so just put the dummie window executables somewhere you can find them.
Installing and configurating Xf1re and the Linux Companion software
1 - Configurating Xf1re to the dummie windows
The first thing is to make sure Xf1re is detecting the corresponding .exe. This is simple done by just opening Xf1re, go to 'Tools' > 'Options...' This will open your settings window. Simply go to 'Games' tab, then simply deploy the 'Non-Installed games'
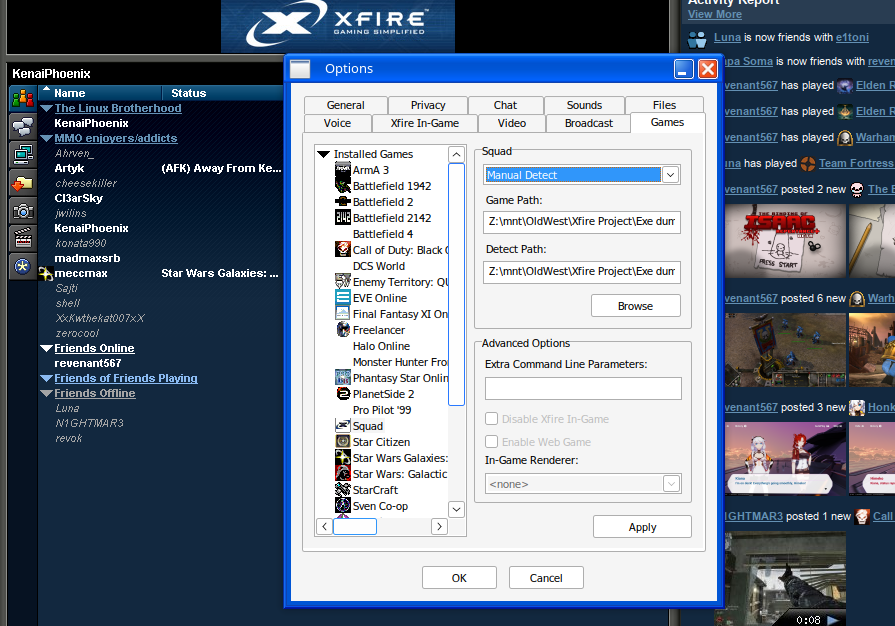
You will need to go the the right side of the window and under the name of the game, deploy the list and set it to 'Manual Detect'. Then just press the 'Browse' button and search for the dummie window .exe. Note that some games entries have like multiple games, so if you dont see your beloved exe on the file explorer, you might want to check the field called 'Files of Type:' that is bellow 'File name'.
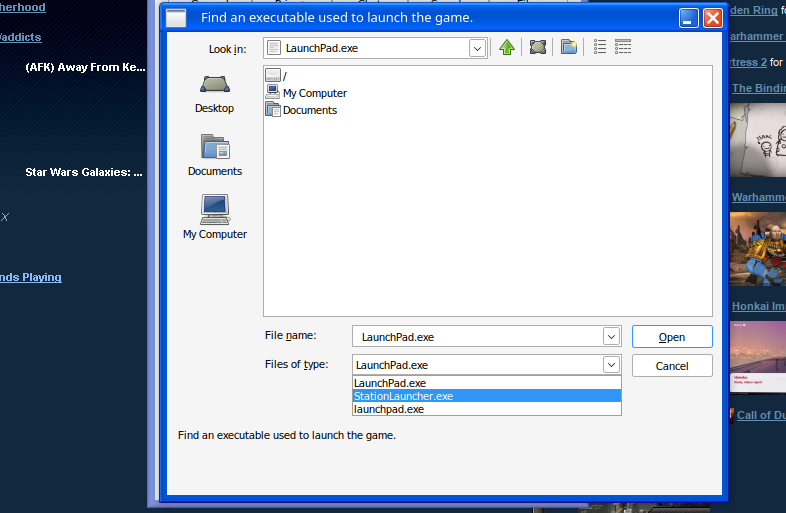
This image correspond to 'Star Wars: Galaxies', this game has 3 possible detectable .exe, LaunchPad.exe, StationLauncer.exe and launchpad.exe. Just change it to the one you have, and it will be displayed on the file explorer.
Special cases:
Dont get mad at me, I didnt program Xfire, and neither did them program it to Linux. Regardless who is to blame there are some 'special' cases that actually ask for more than just game executable (or exe) on the detection. Such is the case of games that launch from Steam: they will first ask for a 'Steam.exe' THEN they will ask for the .exe of the game. Thankfully the solution is yo just copy and paste your dummie windows exe and change its name. I suggest put them all on a folder, there are some specially messy cases like Battlefield 4:
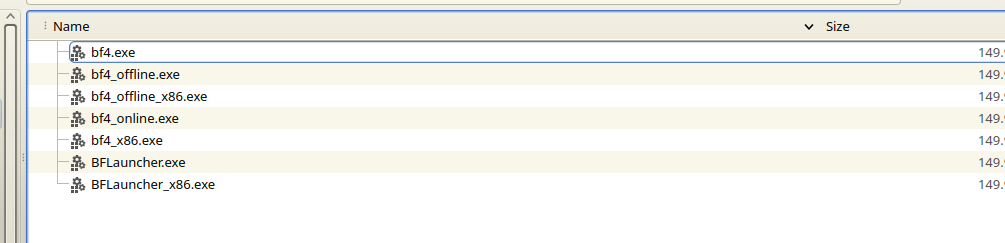
As you can see on the previous image, the detection ask for no less than 7 exe. Did I build each of them? No, I just copy and paste the Dummie one and change the name with F2 (or just right click it). Each can or not have these cases, so I suggest that when you add a dummie window you Just hit 'Apply' rather than 'Ok' since that will just trigger the error and close the settings window, making you open it again.
If you still have some doubts you just need to download the 'Dummie window pack' from this page, and there are already a lot of .exe in folders. So try to add them and see it is actually not that big of a deal.
2 - Setting up the Linux companion app
After everything this is just an incredible simple setting. Just download it from here and drop it in any folder you want to use. Like I said before, this is just a 0.7 version. It works, but Im still working on its GUI version, so for now you will need to run the software on a console, and edit a json. Dont worry, if I made, it must be some simple to use or I wouldnt be able to use it as well.
After you have the software on a folder, just open the terminal there and run it with './penguin_fire_companion'. No flags or anything weird, and no wine or prefix either, this is a native Linux software so dont worry about it. On first run you should see something like this:
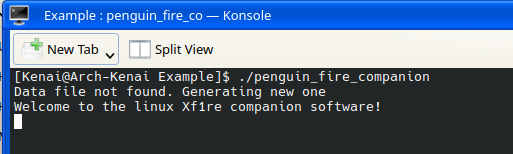
"Data file not found. Generating new one" means that, on the same folder you have the software, a new file called 'config.json' have been generated. It is here where the configuration and set up will take place. You can open it with any text editor, even the same on you used to edit main.cpp. You should find something like this:
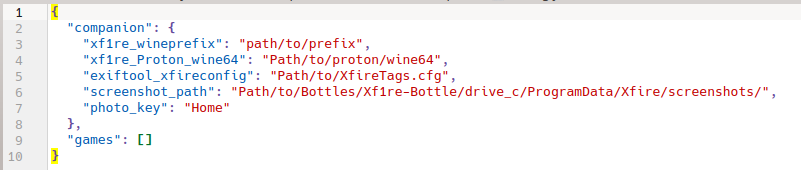
For now the important thing to edit is the software settings, that are the ones below line 2, "companion". This is what you need to add:
- "xf1re_wineprefix" -> This is just the path to the prefix of the actual Xf1re, if you followed the installation from this page (or any installation to be honest) is the folder that contains other folder like 'drive_c'
- "xf1re_Proton_wine64" -> Ok this is actually the more complex one, here you need to find the file 'Wine64' of the proton your Xf1re actually runs. On this page guide it should be on the 'drive_c' of the Xfire installation, from the files you downloaded from the official GE Proton git hub, just search for 'wine64' It should be in something like this:
- Path/To/Proton/GE-Proton11-1/files/lib/wine/x86_64-unix/
Please note of the folder "x86_64-unix", there might be other 'wine64', but you need to use this one. Also note that this exact wine64 is the one we use to open Xf1re. If you are having trouble with detection it might be because the runner of Xf1re and the runners of the dummie windows are different.
- "exiftool_xfireconfig" -> This is straight forward, the software includes a file called 'XfireTags.cfg', DO NOT TOUCH THIS or screenshot might not work. You only need to right click it > 'Copy path' and paste it on this line (or write it yourself).
- "screenshot_path" - > This is the folder where Xfire save the folders. The companion software will then save it then for Xf1re to pick them up. The path is inside your prefix and it is like this:
- "Path/To/Prefix/drive_c/ProgramData/Xfire/screenshots/"
- "photo_key" -> This is just the key to press to take screenshots. I really recommend not touch it so avoid problems that sometimes the software doesnt pick it up that well (not 1.0, please understand).
And those are the configurations for the companion software! Now the only missing part is configurating the games. Yeah, I know it is a pain but In my opinion is better than opening the dummie windows each time you want to track a game. To explain this I will return to the Squad example of the dummie windows. With this I mean, open 'xfire_games.ini' just like before and search for the game to add (Control + F). The entry is like this:
To explain this better I will just present the final version of it:

The names are pretty much self explanatory, but I will point to what part of the 'xfire_games.ini' you should copy and past:
- "name" -> "LongName"
- "xfire_id" -> The numbers on brackets ([ ]) that starts the entry. If there is a _1 (or similar) just use the numbers BEFORE the underscore ( _ )
- "exe_name" -> "DetectExe", and if you dont have any, just use the name of dummie window exe.
- "path_to_dummy" - > This is the path to the dummie window that you created. Just right click it and copy its path, or manually write its direction
And thats it! Next time you open the game, with the companion app open of course, it should detect the game and open the corresponding dummie window in the same prefix as Xf1re so it is picked up by the software. If you press the 'Home' key it will take screenshots and inject it with the corresponding data so it can be uploaded to Xf1re. The companion app also works alongside Xf1re, so you can close it, edit the configuration, and then open it again.
Limitations
So of course this software is not perfect, and as the 0.7 version it has the following limitation (apart for probably bugs of course)
- Lack of a proper GUI
- Games that launch with arguments, like Svencop are not properly detected
- Dummie windows have to be manually closed (aka, press the 'X' on the window). I look at a way to close them with the game.